How to Build and Save Your Own Music Lessons with Kidstrument (Step-by-Step Guide for Primary Teachers)
This guide walks you through exactly what’s happening in the video above. It shows you how to use the Kidstrument Curriculum Designer to build your own lessons, save them, move them around your yearly plan, and teach them instantly in class.
If you’re leading music (or you’ve just been told “you’re doing music this year”) this is for you. No spreadsheets. No rewriting someone else’s plan. You can build what works for your school and deliver it on screen the same day.
For more on what Kidstrument includes, see How Kidstrument Works and browse the full Activity Library.
What the Curriculum Designer Is
Kidstrument already gives you a complete curriculum you can teach straight away, from Early Years all the way to Year 6. But every school is different. Mixed-age classes, breakfast clubs, assemblies, themed weeks, staff strengths… it’s never “one size fits all”.
The Curriculum Designer is where you shape that curriculum for your context.
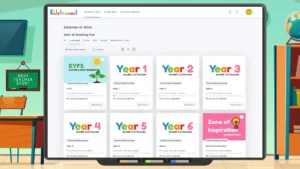
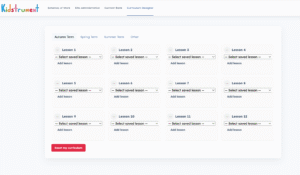
Here’s how it’s laid out:
- A grid of 12 lessons for each term.
- There’s also an “Other” section where you can store extra lessons for things like assemblies, breakfast club, enrichment afternoons, or cover lessons you want to grab quickly.
Everything you save here is re-usable. You’re not building something once and losing it — you’re building something you can drop into any point of your plan, for any class, whenever you need it.
Step 1: Open the Content Bank (“Zone of Inspiration”)
To build your first custom lesson, go to the Zone of Inspiration. This is Kidstrument’s full content bank: rhythm work, warm-ups, call-and-response, pitch games, listening tasks, movement activities, dance sessions, ukulele starters — the whole lot.
On the right-hand side of the screen, you’ll see the Custom Lesson Builder.
This is the panel where you choose what goes in your lesson. You’re not forced to use a pre-made lesson — you’re in charge.
Step 2: Add activities to your lesson
To start building, click the button to add activities.
You can choose up to 15 activities for a single lesson. Those activities can come from anywhere in the Kidstrument library. You can mix:
- a rhythm warm-up,
- a movement/dance task,
- a listening/analysis activity,
- a quick theory check,
- and a performance moment,
— all in one “custom lesson”.
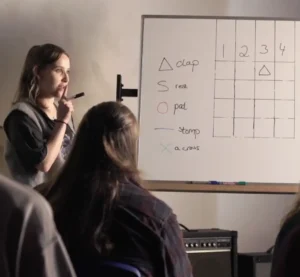
In the video, the example is a dance lesson. The teacher chooses one activity from each genre (e.g. funk / disco / Motown / pop etc.) to build a varied, high-energy session. On screen you’ll see them holding Control (or Command on Mac) to select more than one activity at once before saving.
When you’re happy with your picks, click Save Changes. You’ll now see your custom lesson appear on the right-hand side of the screen.
Step 3: Name and save your lesson
Next, give that lesson a clear name. For example:
- “Y3 Pulse and Movement – Spring 1”
- “KS1 Assembly Songs”
- “Breakfast Club Dance Set”
- “Year 5 Groove Session – 70s Funk”
Naming matters because you’ll be able to re-use this lesson again and again across the school year — and even in multiple places in your grid.
Once named, click to Save Lesson. That lesson now lives in your library of saved lessons.
Step 4: Drop lessons into your yearly grid
Now switch back to the Curriculum Designer view. You’ll see the 12-lesson grid split over three terms, plus the “Other” section.
From here you can:
- Select a saved lesson from your list.
- Add it to a tile in the grid.
You can place the same lesson in more than one slot. For example, if you’ve built a brilliant “Listen and Move” session that works in assemblies as well as class, you can drop it in multiple terms or in the “Other” section for quick access.
Need to move things around? Click the arrows on a tile, then click the new tile you want to move it to. That’s it. You’re not rebuilding anything — you’re just reordering.
Step 5: Teach straight from the grid
When you’re ready to actually deliver that lesson in class, you don’t have to re-plan it. Just click Go to lesson.
That button launches the lesson you built and takes you straight to the first activity.
From there, you can teach directly from the screen in the room — warm-up, main task, listening, performance, cooldown — without hunting for slides or files. This is where Kidstrument is different from PDF-based schemes: it’s designed for live delivery.
After you run an activity, you can mark it as done on the right-hand side. When you tick something off, Kidstrument moves you on to the next activity in your lesson. You just keep going.
This also supports tracking and reporting, because completion feeds into coverage and progression data for subject leaders and SLT.
Step 6: Edit an existing custom lesson
What if you want to tweak a lesson you’ve already built?
Just go back to the Content Bank / Zone of Inspiration, open the Custom Lesson Builder, and add or remove activities.
Because you’ve changed it, Kidstrument will ask you to confirm how you want to save:
- Overwrite this custom lesson – update the original version with your changes.
- Save as a new one – keep the old version and create a second variant (useful if you run slightly different versions for different year groups or clubs).
If you choose to overwrite, confirm using the Overwrite this lesson button. If you choose to create a new one, give it a fresh name and save it separately.
Step 7: Exiting and deleting
To exit a custom lesson while you’re editing it, just click Exit this custom lesson. Important: make sure you’ve saved changes first. If you close without saving, those tweaks aren’t stored.
There are two levels of “removing”, and they’re not the same:
- Remove lesson (in the grid) – This only takes it off that tile in the Curriculum Designer. It does not delete the lesson itself. You can still add it back later.
- Delete lesson (permanently) – If you really want to delete a custom lesson forever, select it from your saved lessons list, click Load, then choose Delete this lesson. That permanently deletes it and there’s no recovery.
After you delete a lesson permanently, it will automatically disappear from any tile in the Curriculum Designer grid. You’ll see the change right away.
Why this matters for you and SLT
1. It respects your timetable. You can build lessons for 30–45 minute music slots, but you can also build short 10–15 minute “music bursts” for mornings, assemblies, or breakfast club. The “Other” section is perfect for that.
2. It supports non-specialists. Any teacher can walk into class, click Go to lesson and deliver. The structure is already there — pulse work, movement, listening, call and response, etc. You don’t have to invent it.
3. It gives you progression evidence. Because lessons are saved and repeatable, you’re not guessing what pupils did. You can show a clear sequence: “We introduced pulse here, developed control here, layered genres here.” This aligns with Ofsted’s expectation to demonstrate intent, implementation and impact in music.
4. It cuts planning duplication. You build it once, then reuse it for: Year 3 classroom teaching, Year 4 cover, Friday assembly, Breakfast club warm-up. That’s huge for workload.
Where to go next
If you want to build your first lesson today:
- Use the Custom Lesson Builder on the right-hand side.
- Pick up to 15 activities you like.
- Name and save the lesson.
- Drop it into the Curriculum Designer grid.
- Click Go to lesson and teach it live.
That’s it. You’ve now built a music session that fits your school, your timetable and your pupils — and you can prove exactly what was taught.
Want to see it working across a whole school? Visit How Kidstrument Works or check out Tracking & Reporting to see how lesson delivery links straight into evidence for subject leaders and SLT.
If you’re ready for a walk-through, you can book a demo here.